How to integrate CESC's new “smart” meter (Iskraemeco ME260) to Home Assistant with behind the meter rooftop solar installation
So you got a new rooftop solar installation. Your distributor installed a brand new smart meter which turned out to be Iskraemeco ME260, a consumer hostile smart meter with no effective means for you to programmatically gather data (well, almost), and your distributor also turned out to be too consumer hostile to provide you with any means of programmatically getting your consumption data from them either, or even be willing to explain certain functions of your smart meter to you. If this sounds like you, read on.
Disclaimer: This is intended mainly for me to remember how to do this later, as such, there is no guarantee that this will work for you. I also ABSOLUTELY DO NOT condone work on your house's main lines unless you know what you are doing, and in some regions, it might even be illegal for you to work on your electrical main lines without being a licensed professional. You won't actually have to even touch your main lines for this guide, but the disclaimer applies nonetheless.
Acknowledgement
Without the Open Home Foundation and the Home Assistant Community, especially the developer and the contributors of Home Assistant Glow, I would not have been able to do any of this.
It would have been easier if CESC, my distributor, had helped me with any information about my meter, but they were too busy chastising me for attempting to integrate my energy data to Home Assistant since they think that without time-of-use rates, it's worthless to monitor my power usage, and that I should just take a reading manually every night if I am so interested. Thanks for fueling this project with spite, I got record turnaround!
Assumptions
This guide makes several assumptions that reflect my personal choices. If you have different needs, or if you use something other than what I did, you will need to adapt this guide to your needs.
- You have a Iskraemeco ME260 meter.
- Or any energy meter that has two indicator lights to indicate the net flow of energy, one light indicating kWh, and one light indicating kVarh, and blinks 3200 times (trivial to change in code later) per unit of kWh or kVarh of net energy flow through the meter. This means that the blinking LED lights indicate your exported energy when your generation is greater than your consumption, and your imported energy when your consumption is greater than your generation. If your meter measures your consumption separately, then this blog post doesn't apply to you, since you already have all the info that we are trying to calculate.
- You have Home Assistant up and running in your home.
- You have accurate generation data from your inverter.
- You are comfortable with scripting and tinkering, and have a multi-meter.
Things you will need
- 1x ESP32, or ESP8266 (either works, I use a ESP8266 since they are so darn cheap, this guide will assume that you are using a NodeMCU ESP8266)
- 2x LDR Modules with LDR (something like this)
- 1x ADS1115 (since ESP32 and ESP8266 have way too much noise in their ADCs)
- 1x CT Clamp with voltage output (something like this, please choose your required amperage, but remember that in this specific case, it is better to underestimate your amperage than overestimate it)
- 1x 3.5mm audio jack (3 pin, female)
- 2x 10kΩ resistors
- 1x 10µF electrolytic capacitor (10V to 25V is fine)
- 2x 22µF electrolytic capacitor (optional, but nice to have, 10V to 25V is fine)
Wiring
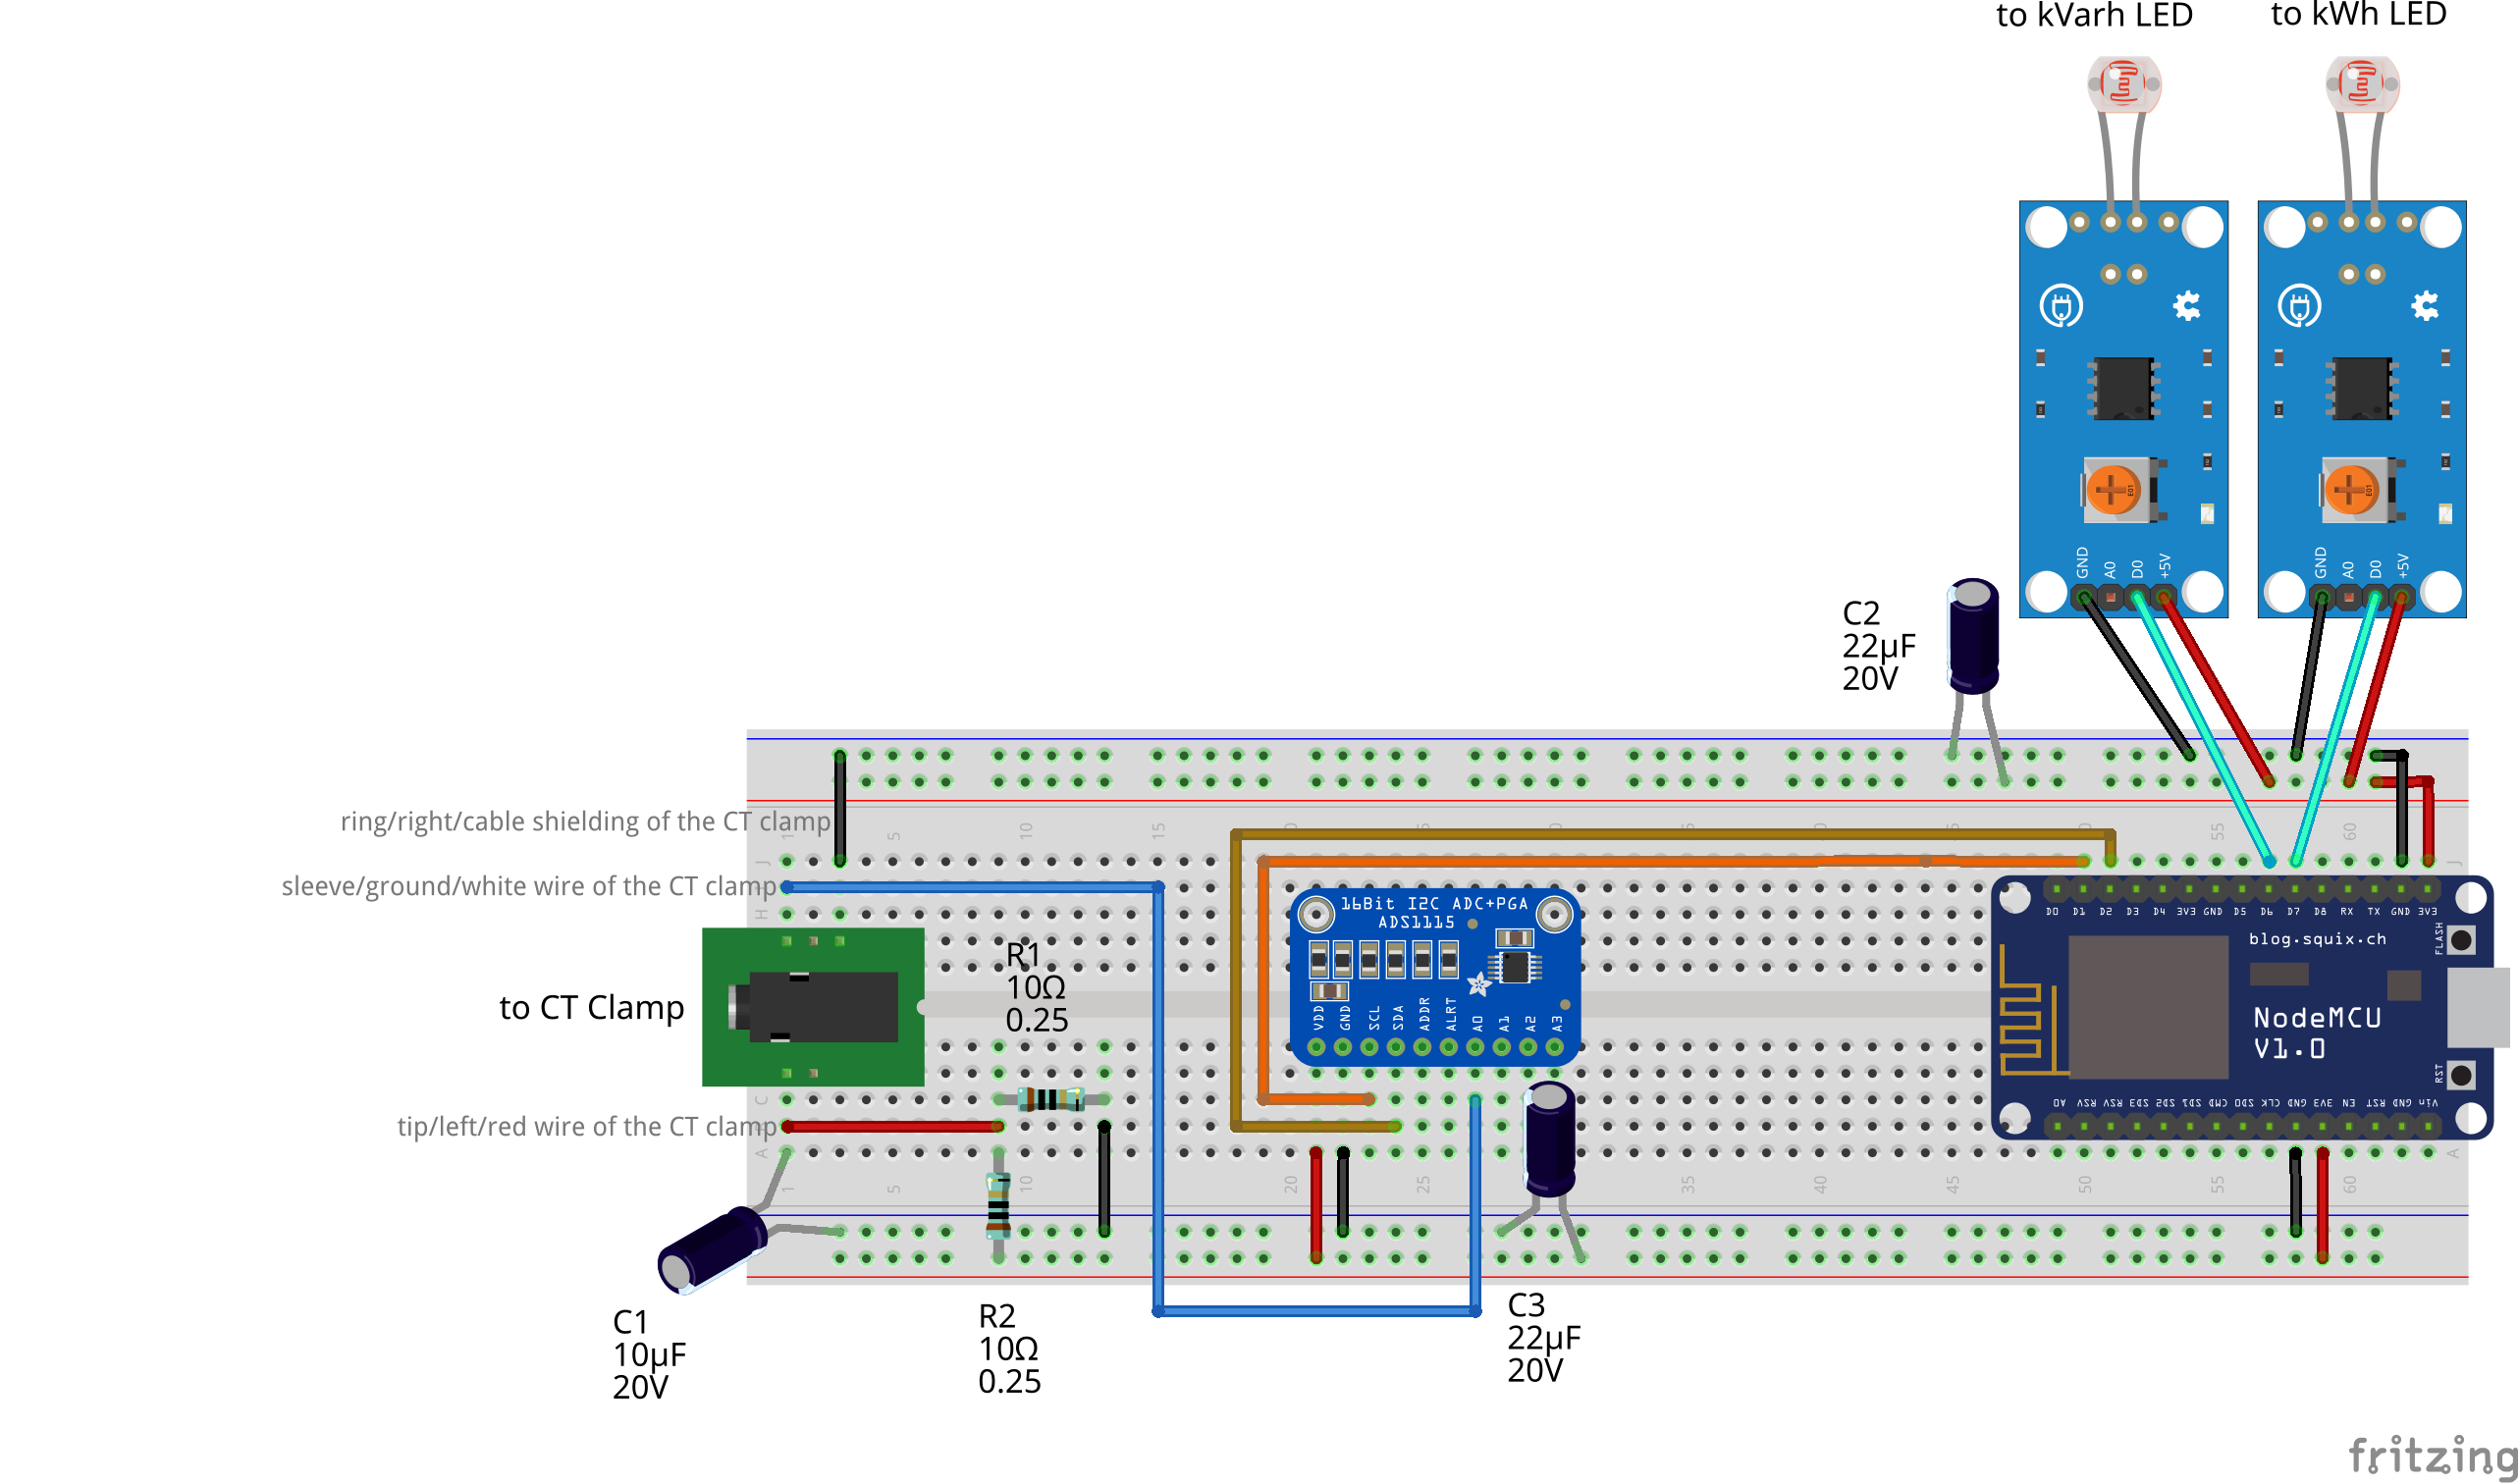
Please let me know if you find any improvements to be made! I'm still learning this stuff!
Installation
This ESPHome YAML file largely follows Home Assistant Glow, but has some minor changes to include the kVarh pulse meter, and the CT clamp in the same device (you can very easily use vanilla Home Assistant Glow yourself with this project, but then you have to have some other controller measuring you kVarh usage, and you mains amperage). Use your ESPHome dashboard to install this YAML file in your NodeMCU ESP8266. Please pay attention to the keys and passwords, which should be auto-generated by Home Assistant's ESPHome addon. If you have any deviations from this blog's assumptions or wiring scheme, you'll need to make those changes here.
esphome:
  name: grid-net-flow
  friendly_name: 'Grid Net Flow'

esp8266:
  board: esp01_1m

# Enable logging
logger:

# Enable Home Assistant API
api:
  encryption:
    key: "7x2fgb3oK7RXgBmWYPjjEXq8vd1ePRXkUcPARYERWzU="
  services:
    - service: reset_total_real_energy
      then:
        - button.press:
            id: button_reset_total_real
    - service: reset_total_reactive_energy
      then:
        - button.press:
            id: button_reset_total_reactive

ota:
  - platform: esphome
    password: "a742d78ef1fa851e8d7d8e7c06495588"

wifi:
  ssid: !secret wifi_ssid
  password: !secret wifi_password

  # Enable fallback hotspot (captive portal) in case wifi connection fails
  ap:
    ssid: "Grid Net Flow hotspot"
    password: "OHjwap17xhfV"

substitutions:

  # Define the GPIO pins
  pulse_pin: GPIO13
  pulse_karh_pin: GPIO12
  led_pin_red: GPIO2

# Sensors for ESP version and WIFI information
text_sensor:
  # ESPHome version
  - platform: version
    hide_timestamp: true
    name: 'Grid Net Flow - ESPHome Version'
  # IP address and connected SSID
  - platform: wifi_info
    ip_address:
      name: 'Grid Net Flow - IP Address'
      icon: mdi:wifi
    ssid:
      name: 'Grid Net Flow - Connected SSID'
      icon: mdi:wifi-strength-2

# Enable time component to reset energy at midnight
# https://esphome.io/components/time/homeassistant.html
time:
  - platform: homeassistant
    id: homeassistant_time

# Status LED configuration #
output:
  # - platform: gpio
  #   pin: GPIO5
  #   id: output_blue
  - platform: gpio
    pin: ${led_pin_red}
    id: output_red

light:
  - platform: binary
    internal: true
    id: led_red
    name: Red
    output: output_red

# Pulse meter configuration #
number:
  # Set the pulse rate of the LED on your meter
  - platform: template
    id: select_pulse_rate
    name: 'Pulse rate - imp/kWh'
    optimistic: true
    mode: box
    min_value: 10
    max_value: 10000
    step: 10
    restore_value: yes
    initial_value: 3200

  # Reset total energy to given value
  - platform: template
    id: select_reset_total_real
    name: 'Reset Value - Transient Total Energy kWh'
    entity_category: config
    optimistic: true
    mode: box
    min_value: 0
    max_value: 1000000
    step: 1
    initial_value: 0

  # Reset total energy to given value
  - platform: template
    id: select_reset_total_reactive
    name: 'Reset Value - Total Energy kVarh'
    entity_category: config
    optimistic: true
    mode: box
    min_value: 0
    max_value: 1000000
    step: 1
    initial_value: 0

button:
  # Restart the ESP
  - platform: restart
    name: "Restart - Grid Net Flow Sensor"

  # Reset the total real energy entity
  - platform: template
    id: button_reset_total_real
    name: "Reset - Transient Total Real Energy Flow"
    on_press:
      - pulse_meter.set_total_pulses:
          id: sensor_energy_pulse_meter
          value: !lambda "return id(select_reset_total_real).state * id(select_pulse_rate).state;"

  # Reset the total reactive energy entity
  - platform: template
    id: button_reset_total_reactive
    name: "Reset - Total Reactive Energy"
    on_press:
      - pulse_meter.set_total_pulses:
          id: sensor_react_energy_pulse_meter
          value: !lambda "return id(select_reset_total_reactive).state * id(select_pulse_rate).state;"

i2c:
  sda: GPIO4
  scl: GPIO5

ads1115:
  - address: 0x48
    continuous_mode: on

sensor:
  # ADS1115
  - platform: ads1115
    multiplexer: 'A0_GND'
    gain: 4.096
    name: "CT Clamp Raw Value"
    id: ads1115_sensor
    update_interval: 0.5s
    accuracy_decimals: 2

  # CT Clamp
  - platform: ct_clamp
    sensor: ads1115_sensor
    name: "Consumption Current"
    sample_duration: 400ms
    update_interval: 0.5s
    id: consumption_current
    accuracy_decimals: 1
    #filters:
      #- calibrate_linear:
          ## Measured value of 0 maps to 0A
          #- 0.00 -> 0.00
          ## Known load: 2.27A
          ## Value shown in logs: 0.08865A
          #- 0.08865 -> 2.27

  # WiFi signal
  - platform: wifi_signal
    name: "Grid Net Flow - WiFi Signal"
    update_interval: 120s

  # Pulse meter kWh
  - platform: pulse_meter
    id: sensor_energy_pulse_meter
    name: 'Net Real Power Flow'
    unit_of_measurement: W
    state_class: measurement
    device_class: power
    icon: mdi:flash-outline
    accuracy_decimals: 3
    pin: ${pulse_pin}
    internal_filter: 2ms
    internal_filter_mode: 'PULSE'
    on_raw_value:
      then:
        - light.turn_on:
            id: led_red
        - delay: 0.2s
        - light.turn_off:
            id: led_red
    filters:
      # multiply value = (60 / imp value) * 1000
      # - multiply: 60
      - lambda: return x * ((60.0 / id(select_pulse_rate).state) * 1000.0);

    total:
      id: sensor_total_real_energy
      name: 'Transient Total Real Energy Flow'
      unit_of_measurement: kWh
      icon: mdi:transmission-tower-export
      state_class: total_increasing
      device_class: energy
      accuracy_decimals: 6
      filters:
        # multiply value = 1 / imp value
        # - multiply: 0.001
        - lambda: return x * (1.0 / id(select_pulse_rate).state);

  # Pulse meter kVarh
  - platform: pulse_meter
    id: sensor_react_energy_pulse_meter
    name: 'Reactive Power Consumption'
    unit_of_measurement: Var
    state_class: measurement
    device_class: power
    icon: mdi:flash-outline
    accuracy_decimals: 0
    pin: ${pulse_karh_pin}
    internal_filter: 2ms
    internal_filter_mode: 'PULSE'
    on_raw_value:
      then:
        - light.turn_on:
            id: led_red
        - delay: 0.2s
        - light.turn_off:
            id: led_red
    filters:
      # multiply value = (60 / imp value) * 1000
      # - multiply: 60
      - lambda: return x * ((60.0 / id(select_pulse_rate).state) * 1000.0);


    total:
      id: sensor_total_reactive_energy
      name: 'Total Reactive Energy Consumption'
      unit_of_measurement: kVarh
      icon: mdi:transmission-tower-export
      state_class: total_increasing
      device_class: energy
      accuracy_decimals: 3
      filters:
        # multiply value = 1 / imp value
        # - multiply: 0.001
        - lambda: return x * (1.0 / id(select_pulse_rate).state);

  # Total day usage
  - platform: total_daily_energy
    id: sensor_total_daily_reactive_energy
    name: 'Daily Reactive Energy Consumption'
    power_id: sensor_react_energy_pulse_meter
    unit_of_measurement: kVarh
    icon: mdi:transmission-tower-export
    state_class: total_increasing
    device_class: energy
    accuracy_decimals: 3
    filters:
      # Multiplication factor from Var to kVar is 0.001
      - multiply: 0.001

captive_portal:
Once your modified Home Assistant Glow boots up for the first time, it's time to calibrate your CT clamp sensor. Please be careful from this point onward, since you'll be working close to mains AC voltage; stop if you are unsure, and research about what you are doing from reputed sources (hint: not an LLM). Attach the CT clamp around one of the (insulated) power input wires of a purely resistive known load (such as fan-less radiant heater, hair straightener, resistive water heater, etc.), and calculate your amperage, I, from the formula: I=P/V, where P is the rated power of the purely resistive known load, and V is your mains voltage. You can find out your mains voltage using a multi-meter. Avoid using any load that has a motor, compressor, or large inductors (e.g. the ones in computer power supply units) in it, since that will introduce reactive energy in our wires, and mess with our calibration; if you absolutely have to, try to use something that has a weak (or, maybe small DC) motor as a secondary load, the primary load still needs to be purely resistive. Please go through this forum post to learn more about how to work with CT clamps in the context of Home Assistant and ESPHome: https://community.home-assistant.io/t/esphome-ct-calmp-sct-013-000-and-nodemcu/174608/12.
Once you calibrate your CT clamp sensor, it's time to install the device in place. Simply place the LDR modules in line with the blinking LEDs on your meter (make sure to note what the LED measures, so that you attach the correct LDR module to the corresponding blinking LED), and attach the CT clamp around one of the wires of your main AC input. And voila, you're done with the hard part!
Integrating with Home Assistant
You may think that once you install the ESPHome device on your meter, and its data starts flowing back to Home Assistant, you'll be done, but not quite. Since your meter measures the net flow of energy, you still have a lot of calculations left to calculate your consumption, export revenue, return on investment from your solar, etc.
This is where a custom integration I wrote comes in. Please follow the instructions to install it in Home Assistant here. This custom integration will allow us to measure our consumption power and energy, import power and energy, and export power and energy. Please note that this integration is in its MVP (Minimum Viable Product) state, so for now, it works fine for the absolute basic info that it has to calculate.
Once we get the calculations from the custom integration, we'll find that the calculations can frequently reset, especially if you reboot your Home Assistant, or reset your modified Home Assistant Glow device (again, since the integration is still in its MVP state). While those are rare, they can still introduce large deviations from the real values. To mitigate that, we will create two utility meter helpers.
Today's Imported Energy: We'll create this utility meter to aggregate the imported energy data from our custom integration. If we keep the reset interval to daily, we can accurately measure the amount of energy we imported from the grid each day.
Today's Exported Energy: We'll create this utility meter to aggregate the exported energy data from our custom integration. If we keep the reset interval to daily, we can accurately measure the amount of energy we exported to the grid each day.
This will also allow us to rapidly develop and test new code without losing too much real data.
At this point, we can effectively set up our Home Assistant Energy Dashboard. We have our solar generation data from our inverter, and our grid import and export data from the two utility meter helpers we just set up. We won't be able to track costs yet, but at least we'll get the energy usage and distribution data right in our Home Assistant dashboard.
Further Integration for Economic Data
If you are anything like I am, you can never have too much data. And, something as important as the economics of your solar installation should be something that you'd want to keep track of anyway.
We'll start with building a couple more utility meter helpers in Home Assistant. We'll create these aligned to our distributor's billing cycle, to make all the rest of the calculations fairly simple.
Monthly Solar Generation: We'll create this utility meter aligned to our billing cycle to measure how much solar power we have generated in a given billing cycle.
Monthly Grid Import: This is similar to
Today's Imported Energy, but we'll create this utility meter aligned to our billing cycle to measure how much energy we have imported from the grid in a given billing cycle. It might also be better if we chooseToday's Imported Energyas the basis of this aggregation, instead of the Imported Energy sensor value from our custom integration.Monthly Grid Export: This is similar to
Today's Exported Energy, but we'll create this utility meter aligned to our billing cycle to measure how much energy we have exported to the grid in a given billing cycle. It might also be better if we chooseToday's Exported Energyas the basis of this aggregation, instead of the Exported Energy sensor value from our custom integration.
Now that we have the important data aligned to our billing cycle, we can make a few template sensors in Home Assistant to take care of the rest!
These are my template sensors in Home Assistant that tracks all the important metrics of my solar installation. Please note, that this part needs the largest number of changes from you, so that you track your costs, not mine:
# Templates
template:
  - sensor:
      - name: Monthly Net Energy Import
        unit_of_measurement: "kWh"
        icon: mdi:lightning-bolt-circle
        default_entity_id: sensor.net_real_energy_import
        unique_id: net_real_energy_import
        device_class: energy
        state_class: total
        state: "{{ (states('sensor.monthly_energy_import')|float) - (states('sensor.monthly_energy_export')|float) }}"
  - sensor:
      - name: Monthly CESC Fees and Govt. Tax
        unit_of_measurement: INR
        icon: mdi:cash-multiple
        default_entity_id: sensor.monthly_energy_fees_taxes
        unique_id: monthly_energy_fees_taxes
        device_class: monetary
        state_class: total
        state: >
            {% set grid = states('sensor.monthly_energy_import')| float %}
            {% set fixed_cost = 67.5*1.082 %}
            {% if grid|float <= 25 %}
             {{ (fixed_cost + 0.082*(grid * 5.18 ))  | float(0)|round(2) }}
            {% elif grid|float > 25 and grid|float <= 60 %}
             {{ (fixed_cost + 0.082*(25 * 5.18 + (grid - 25) * 5.69 ))  | float(0)|round(2) }}
            {% elif grid|float > 60 and grid|float <= 100 %}
             {{ (fixed_cost + 0.082*(25 * 5.18 + 35 * 5.69 + (grid - 60) * 6.70 ))  | float(0)|round(2) }}
            {% elif grid|float > 100 and grid|float <= 150 %}
             {{ (fixed_cost + 0.082*(25 * 5.18 + 35 * 5.69 + 40 * 6.70 + (grid - 100) * 7.45 ))  | float(0)|round(2) }}
            {% elif grid|float > 150 and grid|float <= 200 %}
             {{ (fixed_cost + 0.082*(25 * 5.18 + 35 * 5.69 + 40 * 6.70 + 50 * 7.45 + (grid - 150) * 7.62 ))  | float(0)|round(2) }}
            {% elif grid|float > 200 and grid|float <= 300 %}
             {{ (fixed_cost + 0.082*(25 * 5.18 + 35 * 5.69 + 40 * 6.70 + 50 * 7.45 + 50 * 7.62 + (grid - 200) * 7.62 ))  | float(0)|round(2) }}
            {% elif grid|float > 300 %}
             {{ (fixed_cost + 0.082*(25 * 5.18 + 35 * 5.69 + 40 * 6.70 + 50 * 7.45 + 50 * 7.62 + 100 * 7.62 + (grid - 300) * 9.21 ))  | float(0)|round(2) }}
            {%else%}
            off
            {% endif %}
  - sensor:
      - name: Monthly Net Energy Cost
        unit_of_measurement: INR
        icon: mdi:cash-multiple
        default_entity_id: sensor.net_energy_cost
        unique_id: net_energy_cost
        device_class: monetary
        state_class: total
        state: >
            {% set grid = states('sensor.net_real_energy_import')| float %}
            {% set fees_taxes = states('sensor.monthly_energy_fees_taxes')| float %}
            {% if grid|float <= 0 %}
             {{ fees_taxes  | float(0)|round(2) }}
            {% elif grid|float > 0 and grid|float <= 25 %}
             {{ (fees_taxes + grid * 5.18 )  | float(0)|round(2) }}
            {% elif grid|float > 25 and grid|float <= 60 %}
             {{ (fees_taxes + 25 * 5.18 + (grid - 25) * 5.69 )  | float(0)|round(2) }}
            {% elif grid|float > 60 and grid|float <= 100 %}
             {{ (fees_taxes + 25 * 5.18 + 35 * 5.69 + (grid - 60) * 6.70 )  | float(0)|round(2) }}
            {% elif grid|float > 100 and grid|float <= 150 %}
             {{ (fees_taxes + 25 * 5.18 + 35 * 5.69 + 40 * 6.70 + (grid - 100) * 7.45 )  | float(0)|round(2) }}
            {% elif grid|float > 150 and grid|float <= 200 %}
             {{ (fees_taxes + 25 * 5.18 + 35 * 5.69 + 40 * 6.70 + 50 * 7.45 + (grid - 150) * 7.62 )  | float(0)|round(2) }}
            {% elif grid|float > 200 and grid|float <= 300 %}
             {{ (fees_taxes + 25 * 5.18 + 35 * 5.69 + 40 * 6.70 + 50 * 7.45 + 50 * 7.62 + (grid - 200) * 7.62 )  | float(0)|round(2) }}
            {% elif grid|float > 300 %}
             {{ (fees_taxes + 25 * 5.18 + 35 * 5.69 + 40 * 6.70 + 50 * 7.45 + 50 * 7.62 + 100 * 7.62 + (grid - 300) * 9.21 )  | float(0)|round(2) }}
            {%else%}
            off
            {% endif %}
  - sensor:
      - name: Monthly Gross Energy Cost
        unit_of_measurement: INR
        icon: mdi:cash-multiple
        default_entity_id: sensor.gross_energy_cost
        unique_id: gross_energy_cost
        device_class: monetary
        state_class: total
        state: >
            {% set grid = states('sensor.monthly_energy_import')| float %}
            {% set fees_taxes = states('sensor.monthly_energy_fees_taxes')| float %}
            {% if grid|float <= 25 %}
             {{ (fees_taxes + grid * 5.18 )  | float(0)|round(2) }}
            {% elif grid|float > 25 and grid|float <= 60 %}
             {{ (fees_taxes + 25 * 5.18 + (grid - 25) * 5.69 )  | float(0)|round(2) }}
            {% elif grid|float > 60 and grid|float <= 100 %}
             {{ (fees_taxes + 25 * 5.18 + 35 * 5.69 + (grid - 60) * 6.70 )  | float(0)|round(2) }}
            {% elif grid|float > 100 and grid|float <= 150 %}
             {{ (fees_taxes + 25 * 5.18 + 35 * 5.69 + 40 * 6.70 + (grid - 100) * 7.45 )  | float(0)|round(2) }}
            {% elif grid|float > 150 and grid|float <= 200 %}
             {{ (fees_taxes + 25 * 5.18 + 35 * 5.69 + 40 * 6.70 + 50 * 7.45 + (grid - 150) * 7.62 )  | float(0)|round(2) }}
            {% elif grid|float > 200 and grid|float <= 300 %}
             {{ (fees_taxes + 25 * 5.18 + 35 * 5.69 + 40 * 6.70 + 50 * 7.45 + 50 * 7.62 + (grid - 200) * 7.62 )  | float(0)|round(2) }}
            {% elif grid|float > 300 %}
             {{ (fees_taxes + 25 * 5.18 + 35 * 5.69 + 40 * 6.70 + 50 * 7.45 + 50 * 7.62 + 100 * 7.62 + (grid - 300) * 9.21 )  | float(0)|round(2) }}
            {%else%}
            off
            {% endif %}
  - sensor:
      - name: Monthly Solar Revenue
        unit_of_measurement: INR
        icon: mdi:cash-multiple
        default_entity_id: sensor.solar_revenue
        unique_id: solar_revenue
        device_class: monetary
        state_class: total
        state: "{{ ((states('sensor.gross_energy_cost')|float) - (states('sensor.net_energy_cost')|float))|round(2) }}"
  - trigger:
      - platform: state
        entity_id: sensor.monthly_energy_export
        not_to:
          - unavailable
          - unknown
      - platform: state
        entity_id: sensor.monthly_energy_import
        not_to:
          - unavailable
          - unknown
    sensor:
      - name: Monthly Estimated Consumption
        unit_of_measurement: "kWh"
        icon: mdi:home-lightning-bolt-outline
        default_entity_id: sensor.estimated_consumption
        unique_id: estimated_consumption
        device_class: energy
        state_class: total
        state: "{{ states('sensor.monthly_energy_import')| float + states('sensor.monthly_solar_generation')|float - states('sensor.monthly_energy_export')|float }}"
  - sensor:
      - name: Monthly Estimated Consumption Cost
        unit_of_measurement: INR
        icon: mdi:cash-multiple
        default_entity_id: sensor.estimated_consumption_cost
        unique_id: estimated_consumption_cost
        device_class: monetary
        state_class: total
        state: >
            {% set grid = states('sensor.estimated_consumption')| float %}
            {% set fixed_cost = 67.5 %}
            {% if grid|float <= 25 %}
             {{ (1.082*(fixed_cost + grid * 5.18 ))  | float(0)|round(2) }}
            {% elif grid|float > 25 and grid|float <= 60 %}
             {{ (1.082*(fixed_cost + 25 * 5.18 + (grid - 25) * 5.69 ))  | float(0)|round(2) }}
            {% elif grid|float > 60 and grid|float <= 100 %}
             {{ (1.082*(fixed_cost + 25 * 5.18 + 35 * 5.69 + (grid - 60) * 6.70 ))  | float(0)|round(2) }}
            {% elif grid|float > 100 and grid|float <= 150 %}
             {{ (1.082*(fixed_cost + 25 * 5.18 + 35 * 5.69 + 40 * 6.70 + (grid - 100) * 7.45 ))  | float(0)|round(2) }}
            {% elif grid|float > 150 and grid|float <= 200 %}
             {{ (1.082*(fixed_cost + 25 * 5.18 + 35 * 5.69 + 40 * 6.70 + 50 * 7.45 + (grid - 150) * 7.62 ))  | float(0)|round(2) }}
            {% elif grid|float > 200 and grid|float <= 300 %}
             {{ (1.082*(fixed_cost + 25 * 5.18 + 35 * 5.69 + 40 * 6.70 + 50 * 7.45 + 50 * 7.62 + (grid - 200) * 7.62 ))  | float(0)|round(2) }}
            {% elif grid|float > 300 %}
             {{ (1.082*(fixed_cost + 25 * 5.18 + 35 * 5.69 + 40 * 6.70 + 50 * 7.45 + 50 * 7.62 + 100 * 7.62 + (grid - 300) * 9.21 ))  | float(0)|round(2) }}
            {%else%}
            off
            {% endif %}
  - trigger:
      - platform: state
        entity_id: sensor.estimated_consumption_cost
        not_to:
          - unavailable
          - unknown
    sensor:
      - name: Monthly Solar Return on Investment
        unit_of_measurement: INR
        icon: mdi:cash-multiple
        default_entity_id: sensor.solar_return
        unique_id: solar_return
        device_class: monetary
        state_class: total
        state: "{{ ((states('sensor.estimated_consumption_cost')|float) - (states('sensor.net_energy_cost')|float))|round(2) }}"
  - trigger:
      - platform: sun
        event: sunset
        offset: 0
      - platform: numeric_state
        entity_id: sensor.lifetime_solar_return_on_investment
        above: 153700
    sensor:
      - name: Solar Estimated Remaining Payback Period
        icon: mdi:calendar
        default_entity_id: sensor.solar_estimated_remaining_payback_period
        unique_id: solar_estimated_remaining_payback_period
        state: >
            {% set install_date = strptime('2025-11-20 00:00:00+0530', '%Y-%m-%d %H:%M:%S%z') %}
            {% set operating_days = (now() - install_date).days %}
            {% set total_roi = states('sensor.lifetime_solar_return_on_investment') | float %}
            {% if total_roi <= 154700 %}
              {% set days_remaining = operating_days/total_roi*(154700 - total_roi) %}
              {% if days_remaining < 1 %}
                {% set operating_seconds = (now().timestamp() - install_date.timestamp()) %}
                {% set seconds_remaining = operating_seconds/total_roi*(150000 - total_roi) | round(0) %}
                {% set payback_complete_datetime = now() + timedelta(seconds = seconds_remaining) %}
                {{ time_until(payback_complete_datetime, precision=3) }}
              {%else%}
                {% set payback_complete_datetime = now() + timedelta(days = days_remaining) %}
                {{ time_until(payback_complete_datetime, precision=3) }}
              {% endif %}
            {%else%}
              {{ time_until(now(), precision=0) }}
            {% endif %}
Please go through the template and change the necessary items. Pay special attention to the names of the entities, and the staggered tariff that is specific to my situation. Your monthly utility meters might be named different, and unless your distributor is CESC, and you are their LT Domestic (Urban) customer, your tariff will be different too. And of course, your payback period calculation needs to be changed to track your costs, not mine.
But that's it! This will give you your revenue generated from your rooftop solar for each billing cycle, and will help you calculate how much return you are getting on your investment each billing cycle.